
Trip.com es una aplicaciu00f3n global de viajes todo-en-uno para reservar vuelos, hoteles, trenes, alquiler de coches y entradas para atracciones en todo el mundo.
Trip.com: Ctrip’s Global Platform for Flights, Hotels, Train Tickets & Travel Planning Worldwide
Official Step-by-Step Illustrated Guide with Screenshots and Multi-Language PDFs
📱 Official App Downloads
📘 (1) Download Steps
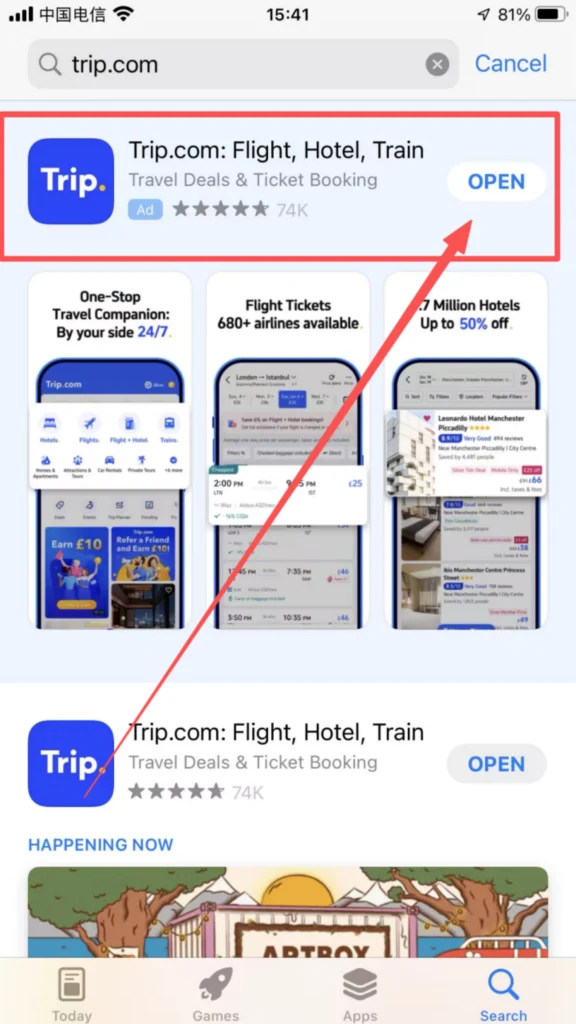
Download & Install Trip.com
International Version (Trip.com, recommended for foreigners): Open the app store on your phone, search for “Trip.com”, and click to download and install.
🔐 (2) Registration and Login Steps
Registration & Login
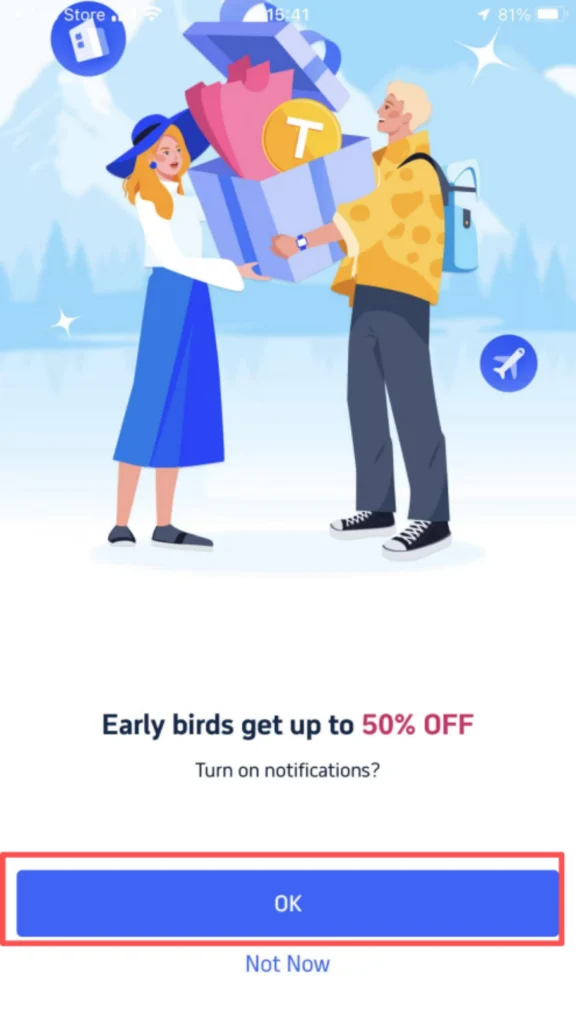
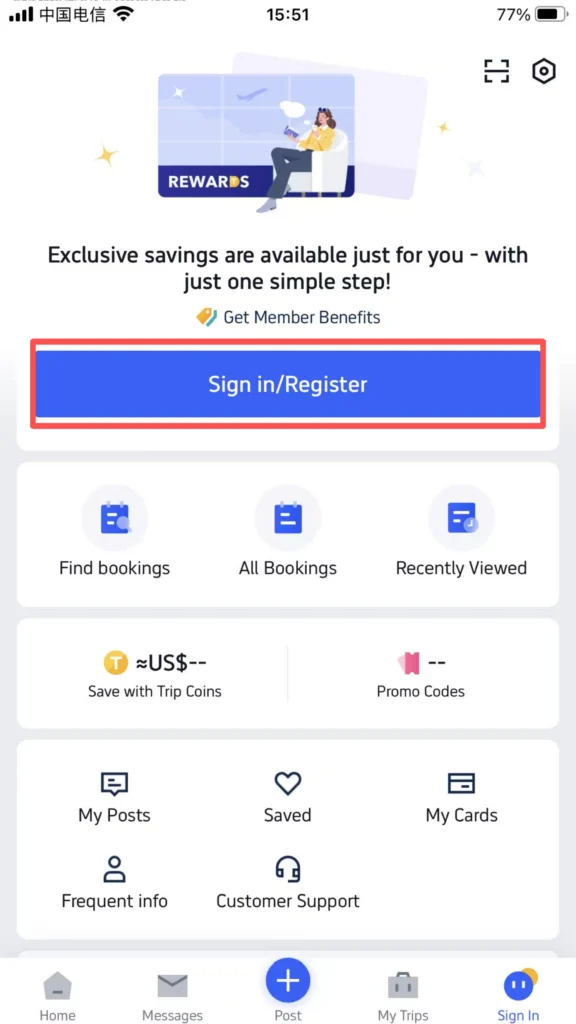
Open the Trip.com APP, and click “Sign in/Register” upon first entry.
1/2
2/2
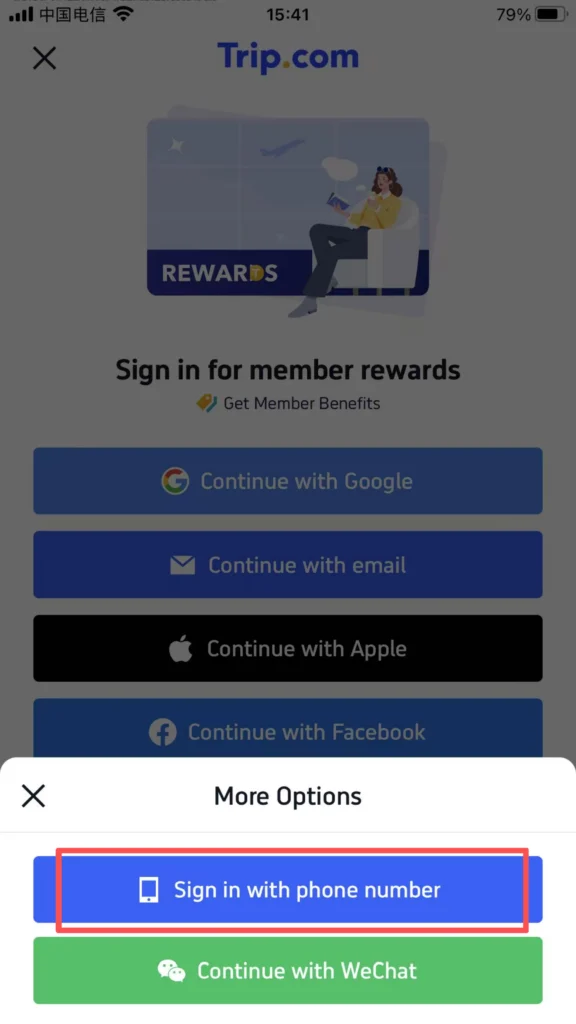
Phone Number (Mobile Number Registration): Select the country/region code, enter the overseas mobile number, get the verification code, enter the verification code, set the password, complete the registration.
1/3
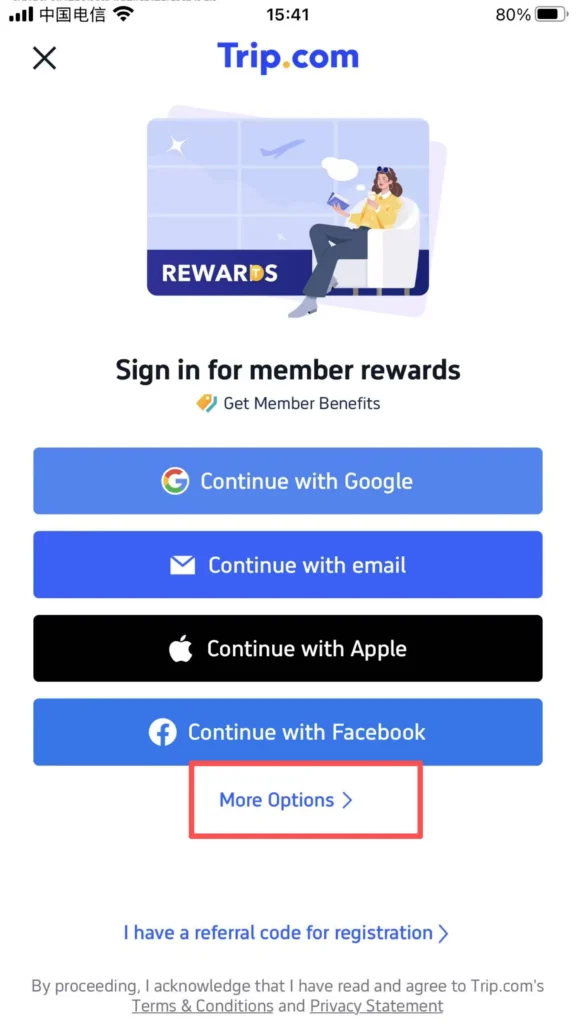
2/3
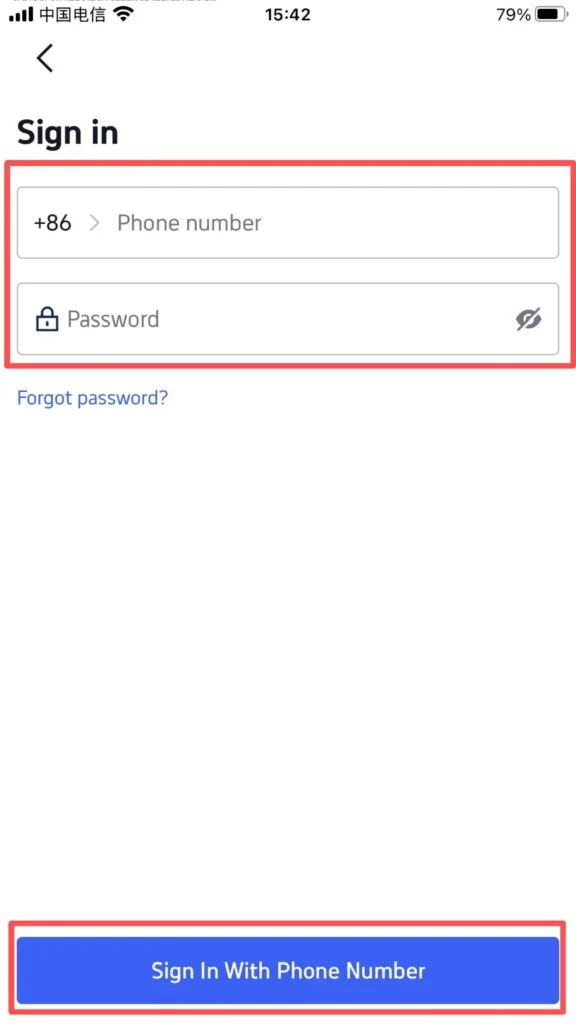
3/3
Email Registration: Enter a commonly used email (Gmail, Outlook, etc.), set a password (8-16 characters, letters and numbers), click “Sign Up”, then open your email, click the verification link, and complete the registration.
Third-party account registration: Google, Facebook, Apple ID: click the corresponding icon, authorize login, no additional registration is required, just bind the account directly.
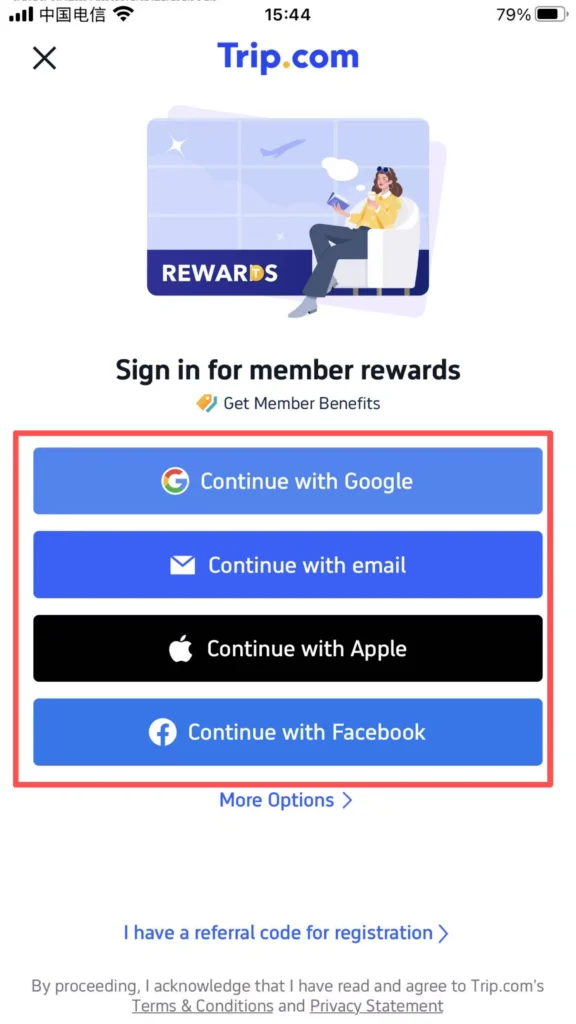
After registration is complete: Click “Sign In”, enter the registered email/phone number and password, or directly use a third-party account to authorize login.
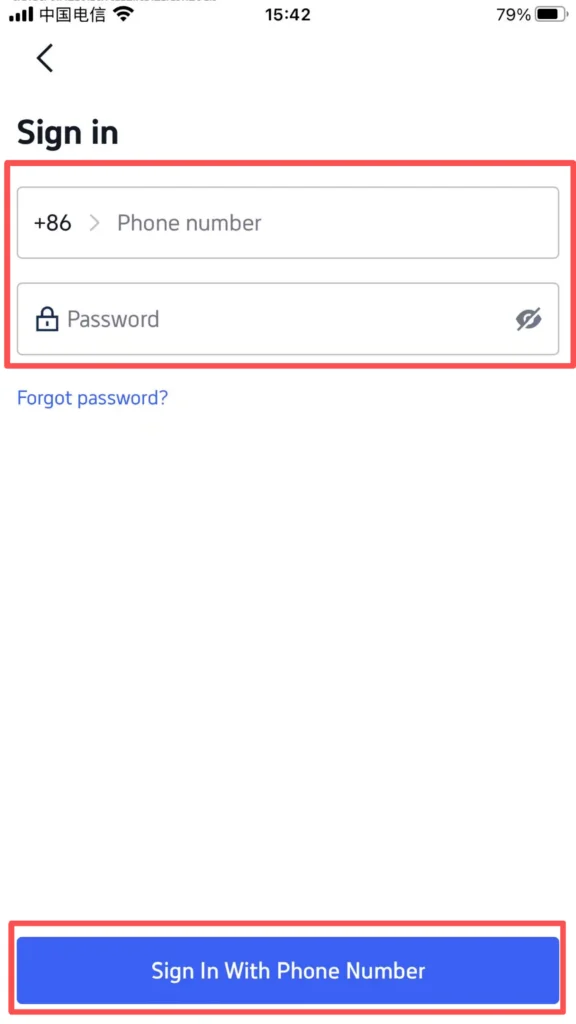
✈️ (3) Detailed Steps for Core Functions
Booking a Flight
International/Domestic Flights Available, Supports Foreign Card Payment
After logging in, click “Flights” on the homepage to enter the flight booking interface.
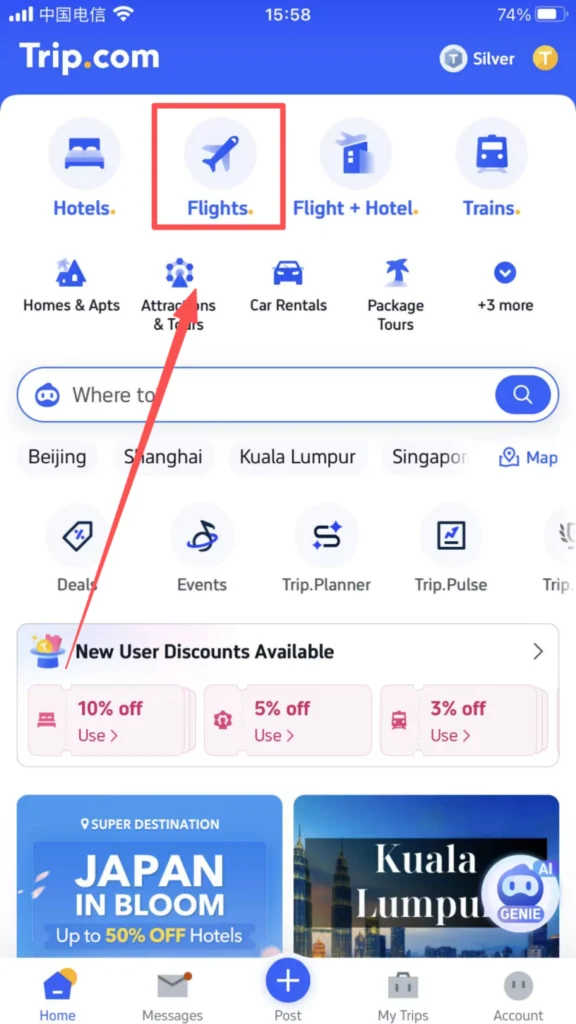
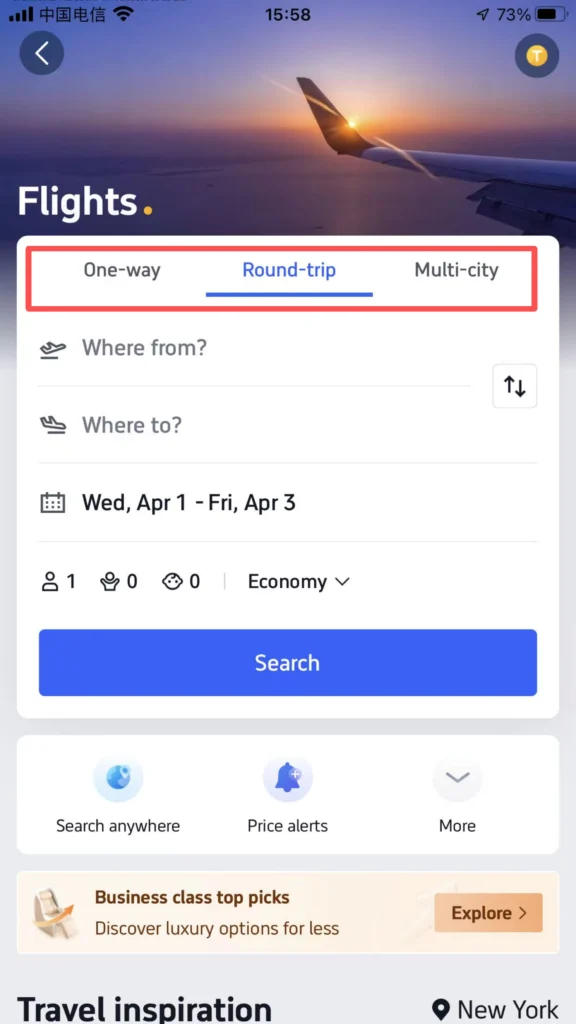
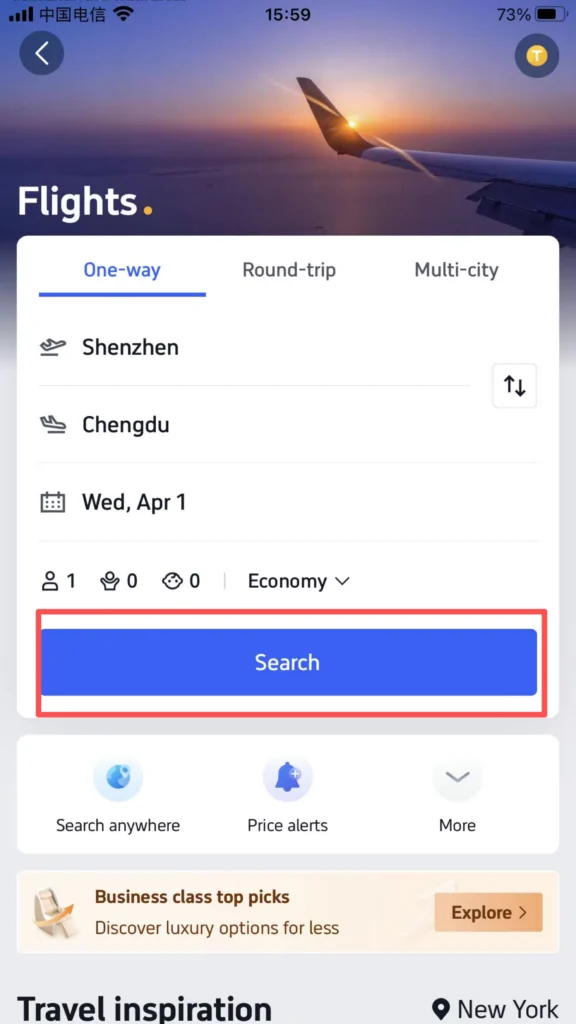
Step 1: Select the type of trip: “One Way”, “Round Trip”, “Multi-City”, choose as needed.
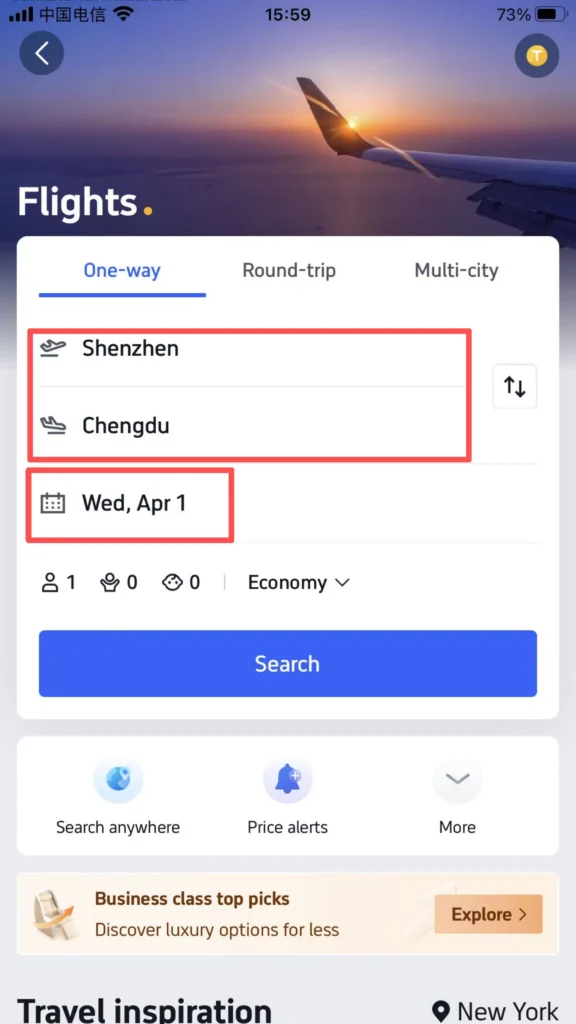
Step 2: Enter the departure and arrival locations (supports input in English, such as “Beijing”, “Shanghai”, “Guangzhou”), and select the departure date (for round trips, you also need to select a return date).
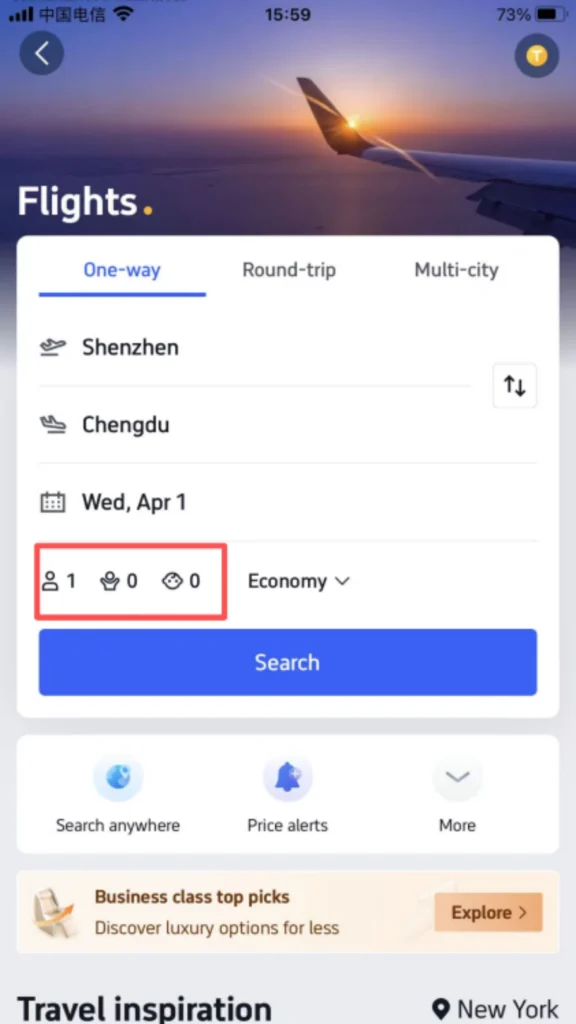
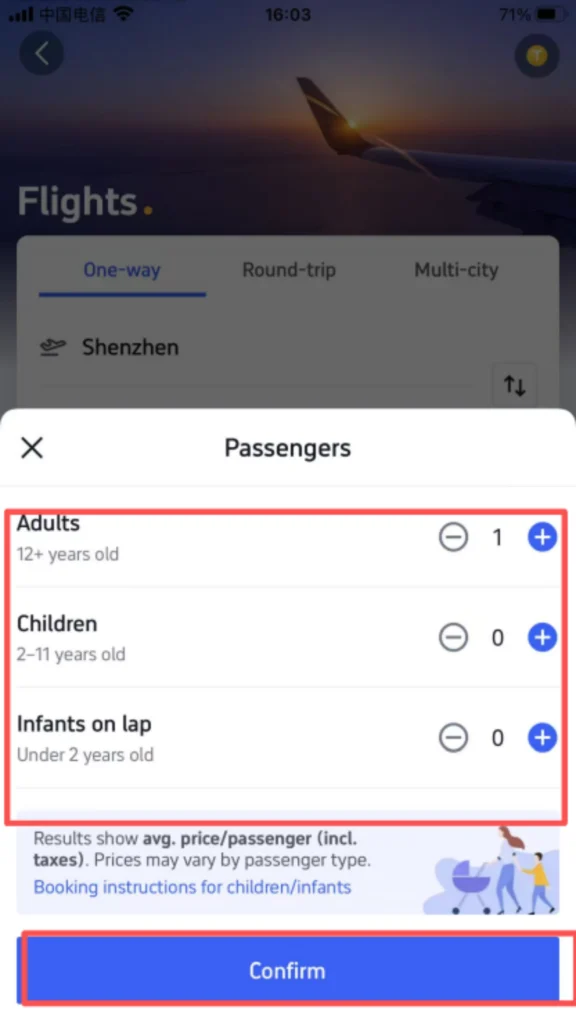
Step 3: Select the number of passengers (Adults, Children, Infants), and click “Search Flights”.
1/3
2/3
3/3
Step 4: On the search results page, you can filter by Price, Departure Time, and Airline. Click on your preferred flight to view detailed information, including departure time, arrival time, aircraft type, and ticket price.
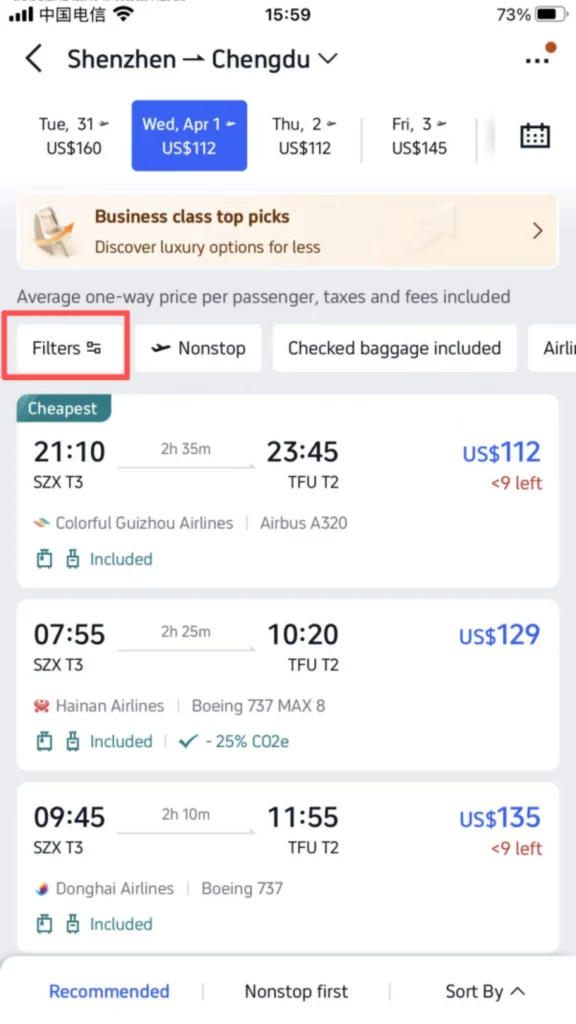
1/2
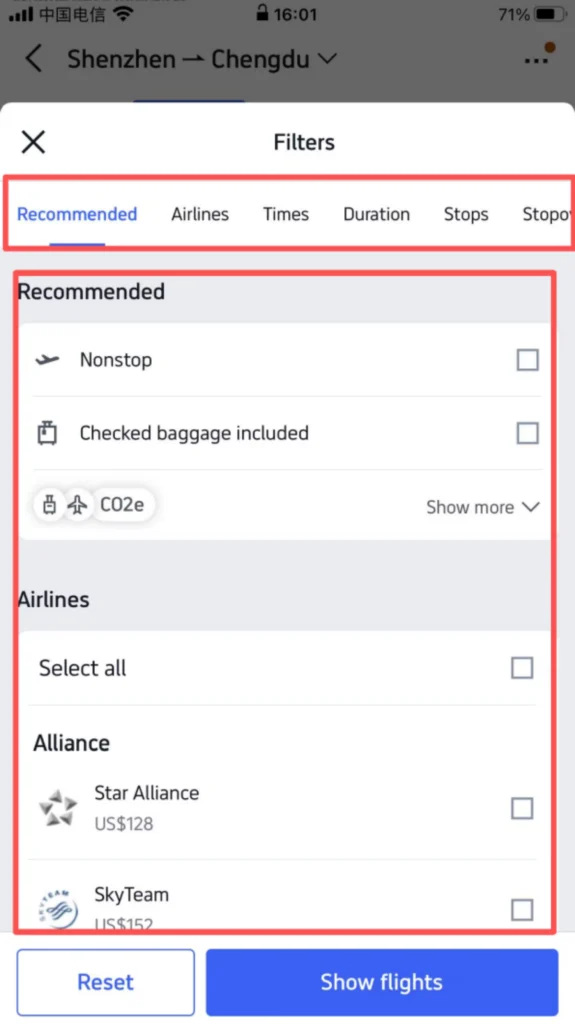
2/2
Step 5: Click “Select” to enter the passenger information page, enter each passenger’s name (matching the passport, in English), passport number, and date of birth, and after confirming everything is correct, click “Continue”; select the baggage allowance (some flights include free baggage allowance, additional baggage can be purchased), then click “Continue”.
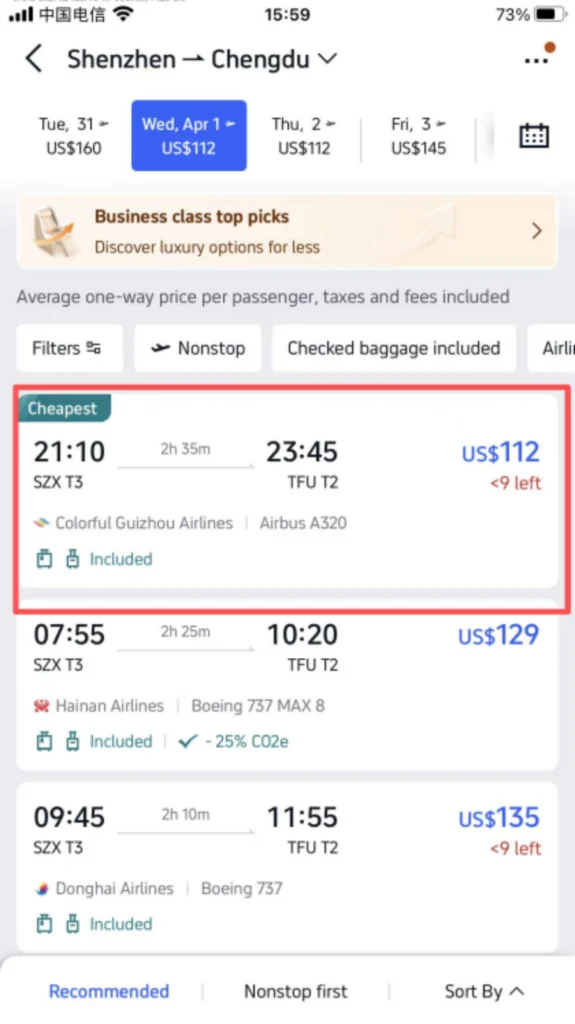
1/3
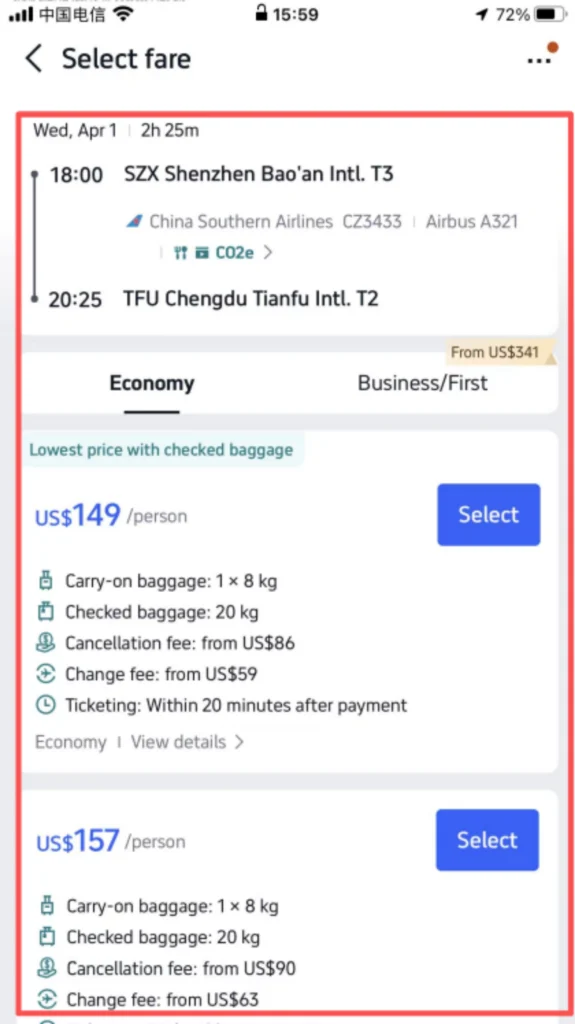
2/3
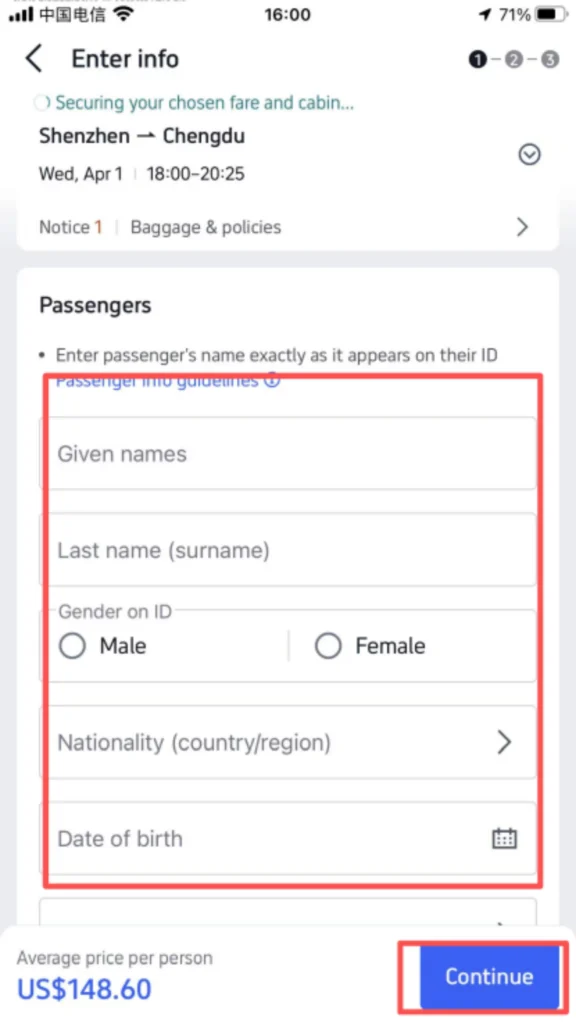
3/3
Step 6: Enter the payment page, select a payment method (linked international credit card, PayPal, etc.), enter the payment information, and click “Pay Now”; after the payment is successful, the app will send a confirmation email and SMS, including the flight ticket order number and flight information, which can be viewed in “My Trip”, or you can go directly to the airport with your passport to check in.
Book Hotels
Nationwide coverage, supports multilingual reviews
Click “Hotels” on the homepage to enter the hotel booking interface.
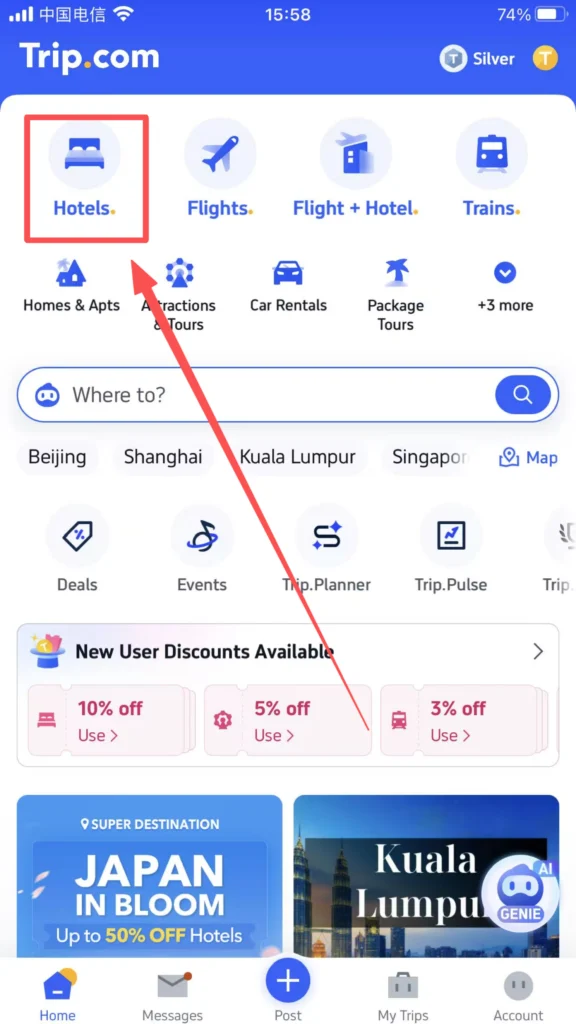
Step 1: Enter the destination (city, scenic area, or street, all can be entered in English), select check-in date and check-out date, enter the number of guests (Adults, Children).
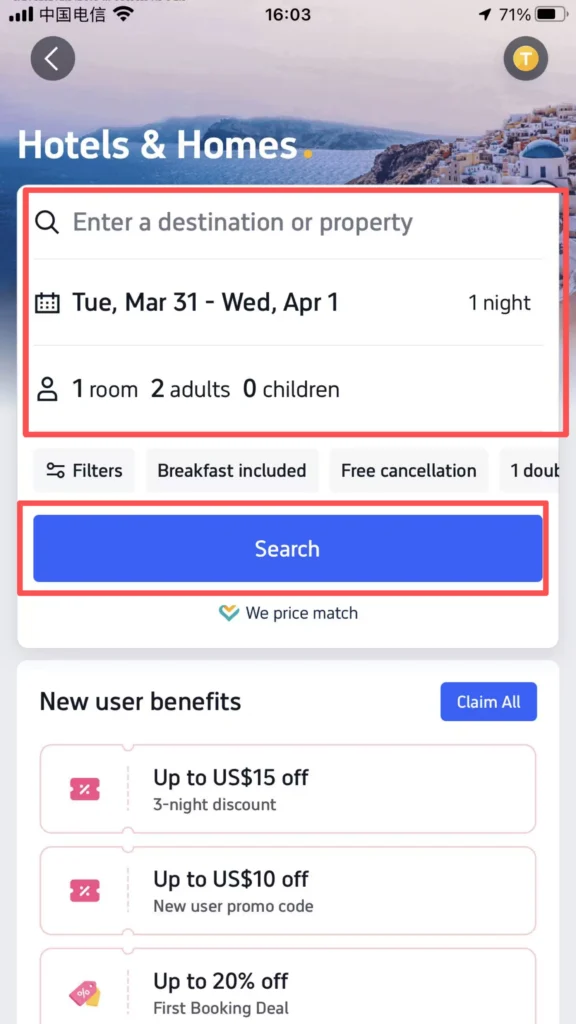
Step 2: Click “Search Hotels”, and the search results can be filtered by price, rating, distance, and hotel type (Hotel, Hostel, Apartment).
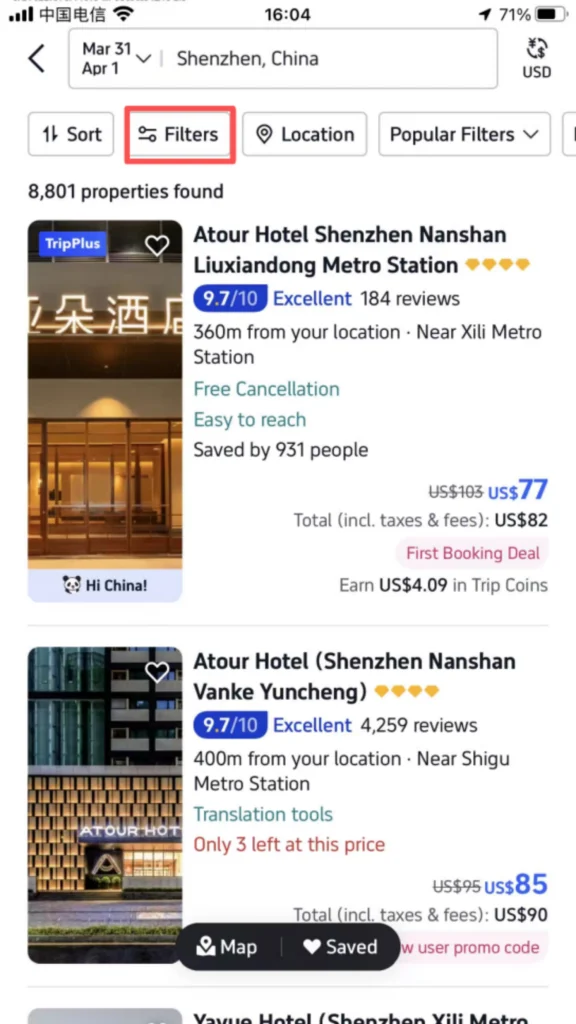
1/2
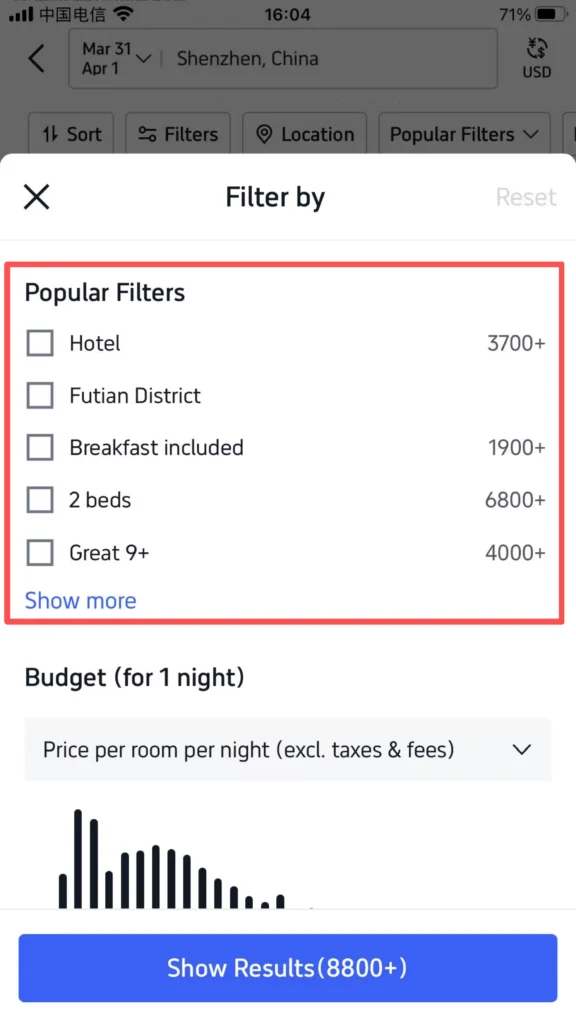
2/2
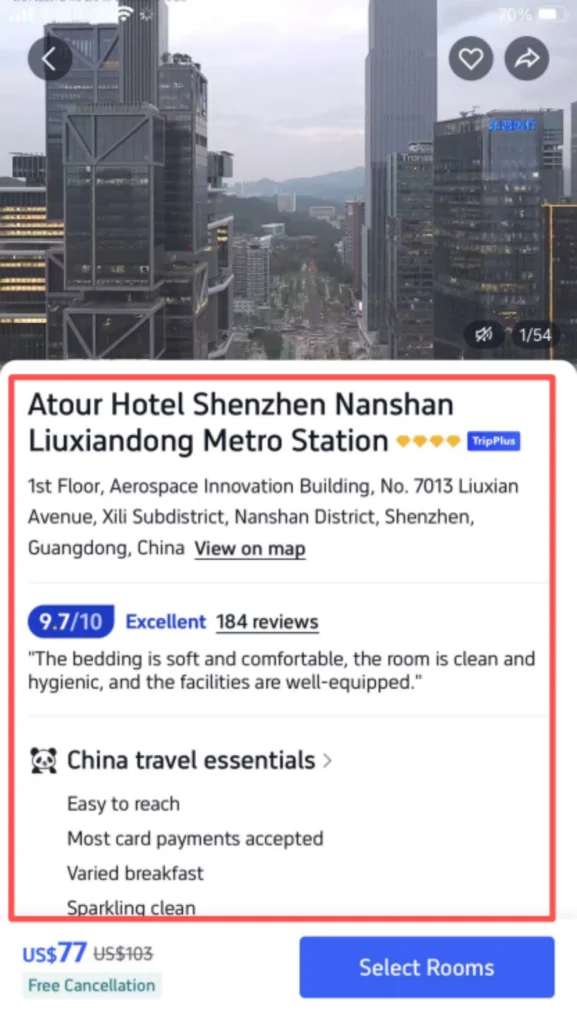
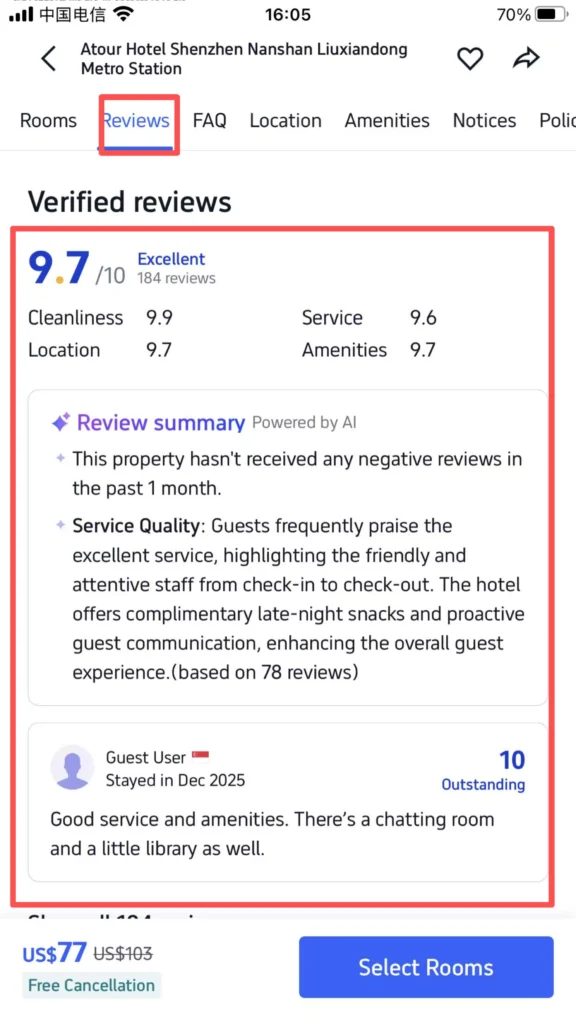
Step 3: Click on the desired hotel to enter the hotel details page, view hotel photos, room types, facilities (free WiFi, breakfast, parking, etc.), and user reviews (multilingual reviews, with the option to filter English reviews).
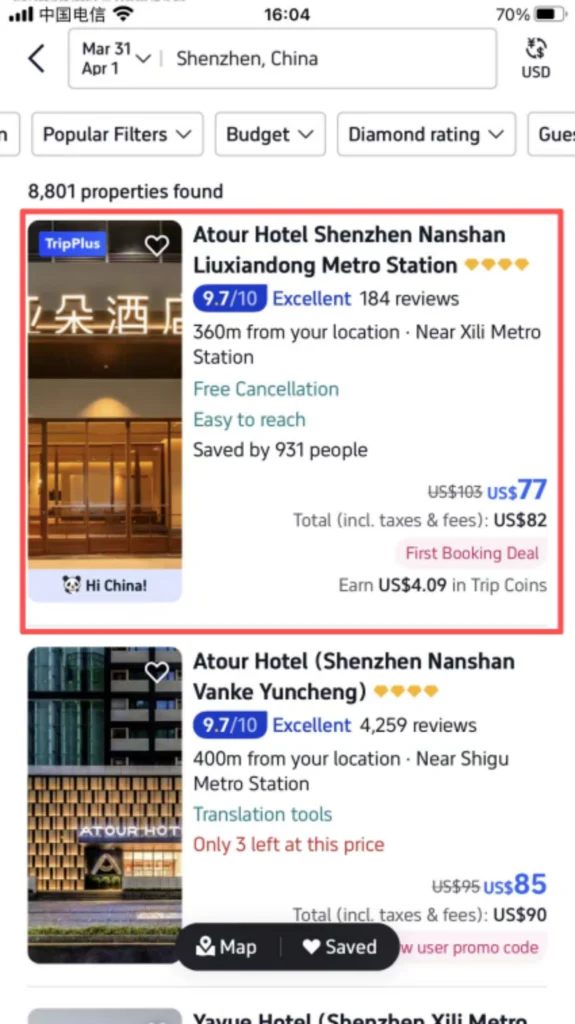
1/3
2/3
3/3
Step 4: Choose the room type (such as Standard Room, Deluxe Room), check the price and cancellation policy (Free Cancellation, Non-Refundable), and click “Book Now”.
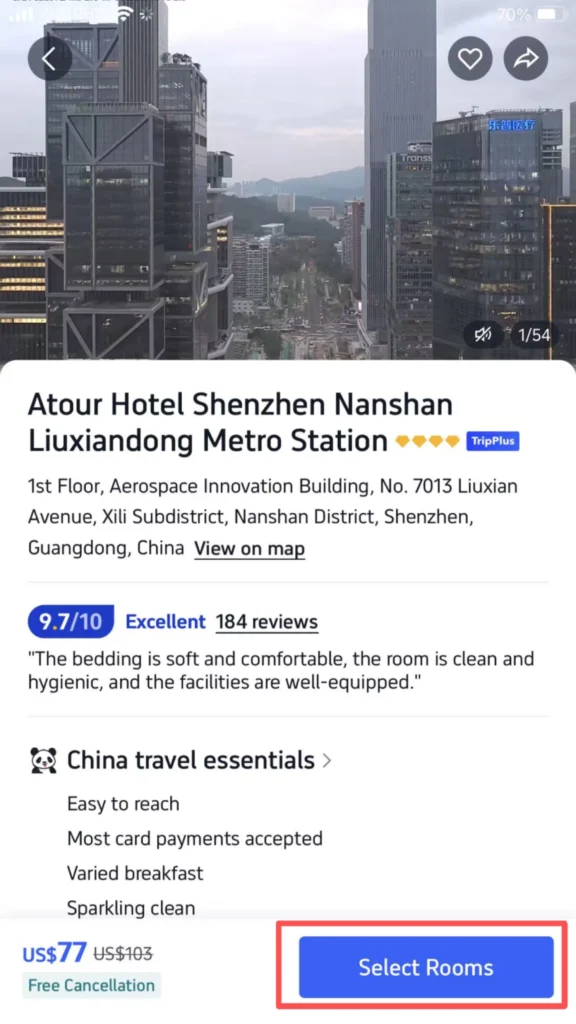
Step 5: Fill in the guest information (name, passport number, consistent with the passport), and click “Continue”.
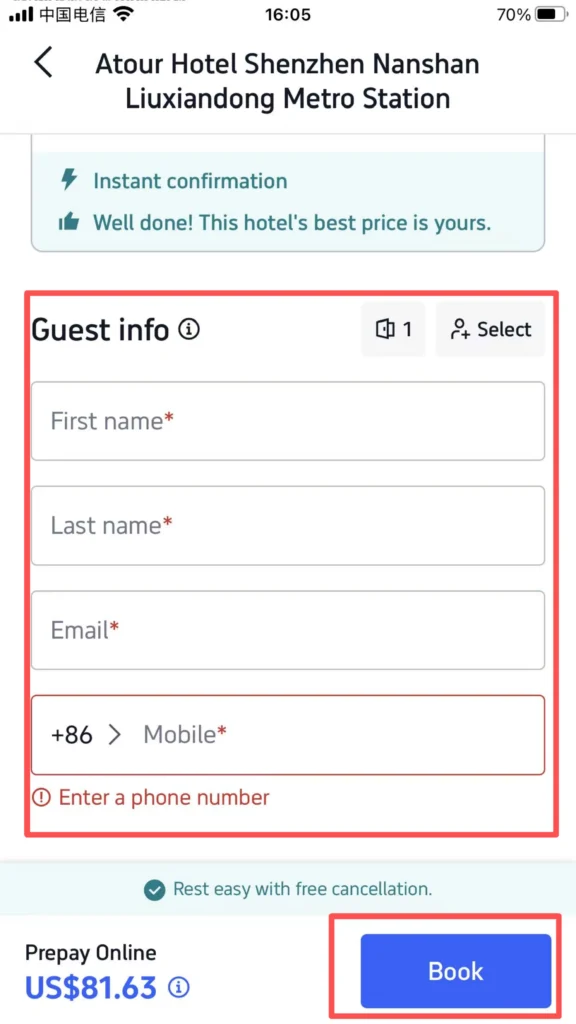
Step 6: Enter the payment page, choose the payment method, complete the payment, and after the payment is successful, you will receive booking confirmation information. You can check in with your passport and booking number.
Booking Train Tickets / High-Speed Rail Tickets
Supports passport booking, no domestic ID required
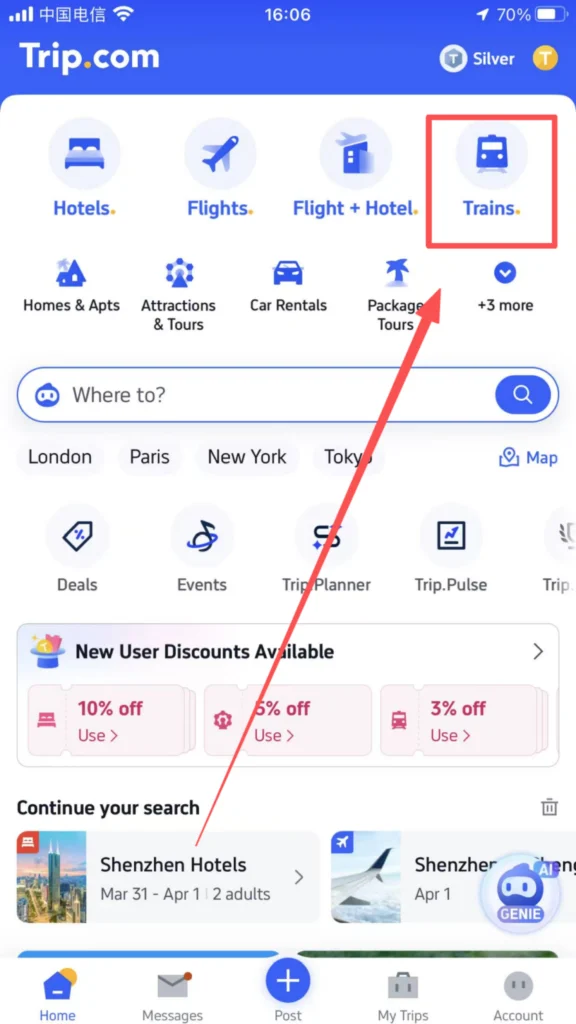
Click “Trains” on the homepage to enter the train ticket booking interface.
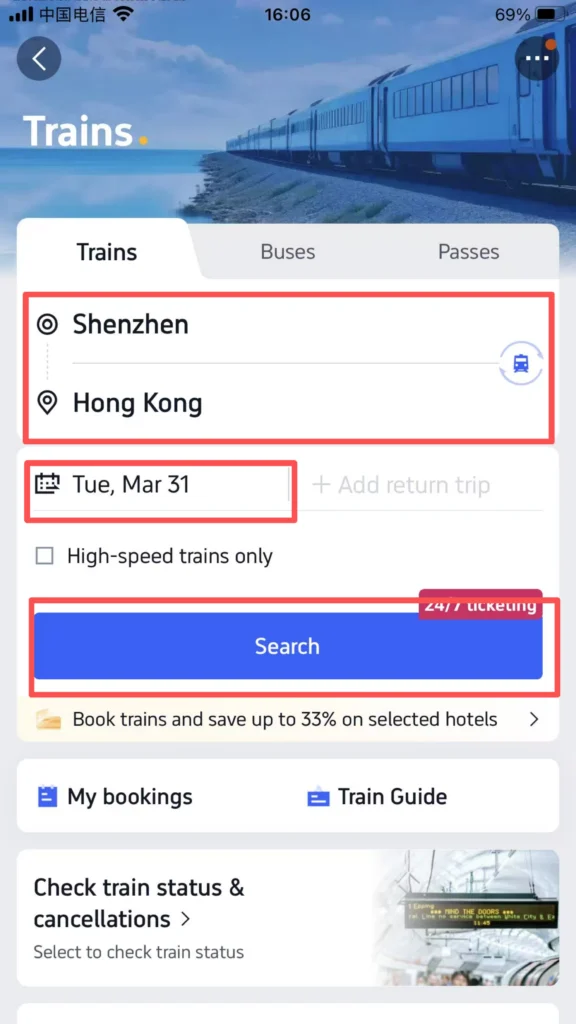
Step 1: Enter the departure station and arrival station (in English or Chinese, such as “Beijing South” or “Shanghai Hongqiao”), select the departure date, and click “Search Trains”.
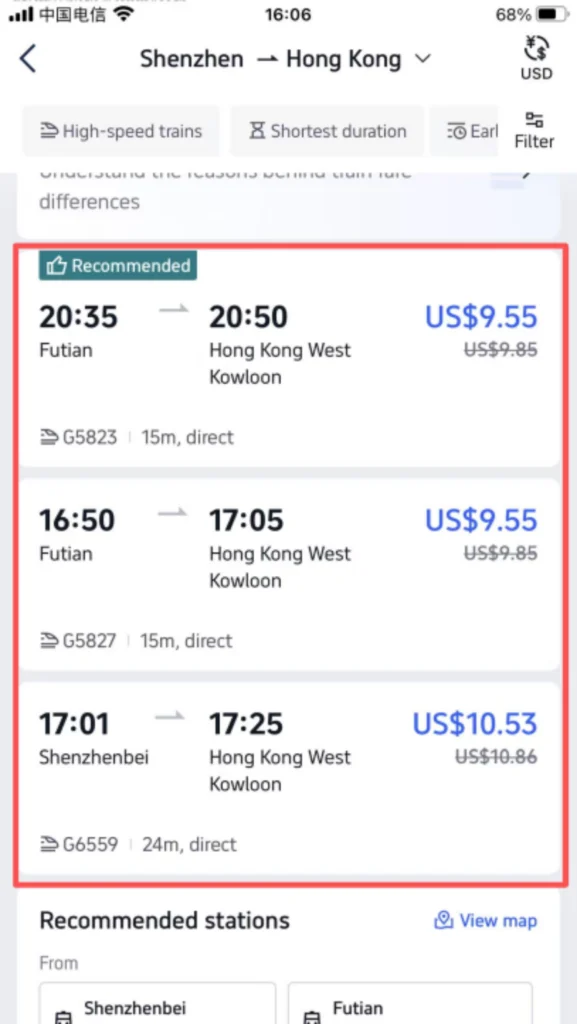
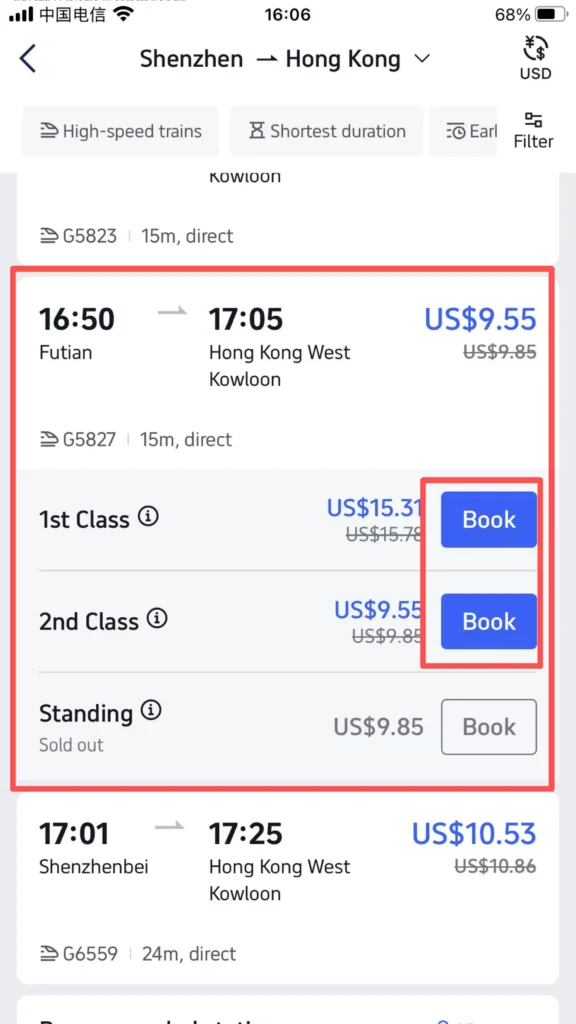
Step 2: On the search results page, check the train schedules, departure times, arrival times, ticket prices, and remaining tickets, click on the desired train, and select the seat type (Second Class, First Class, Business Class).
1/3
2/3
3/3
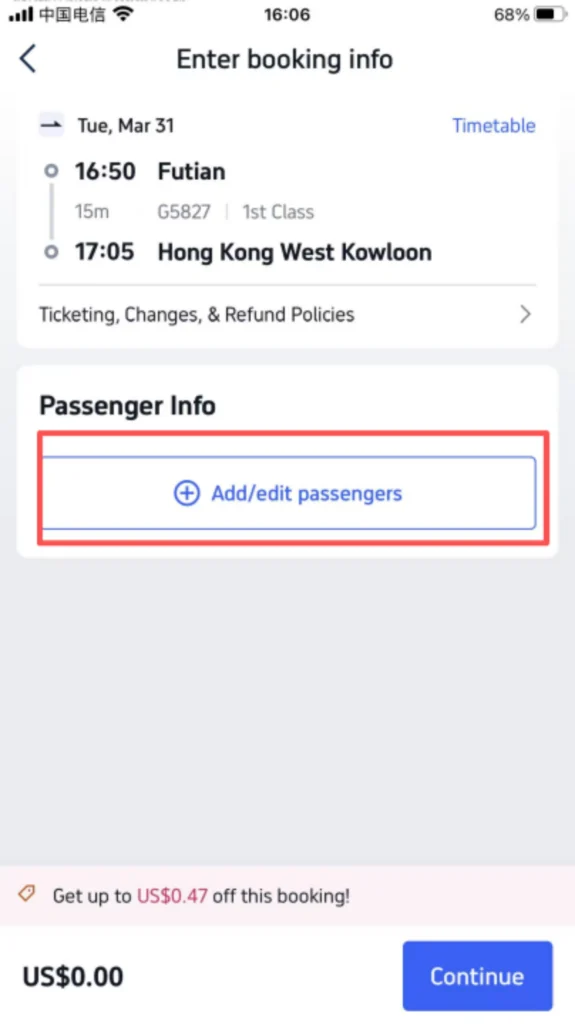
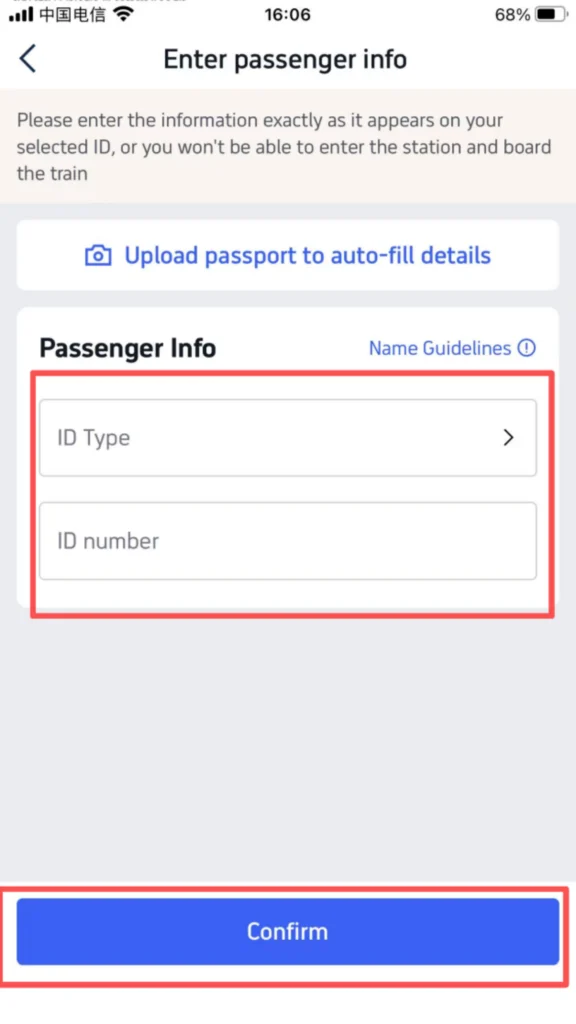
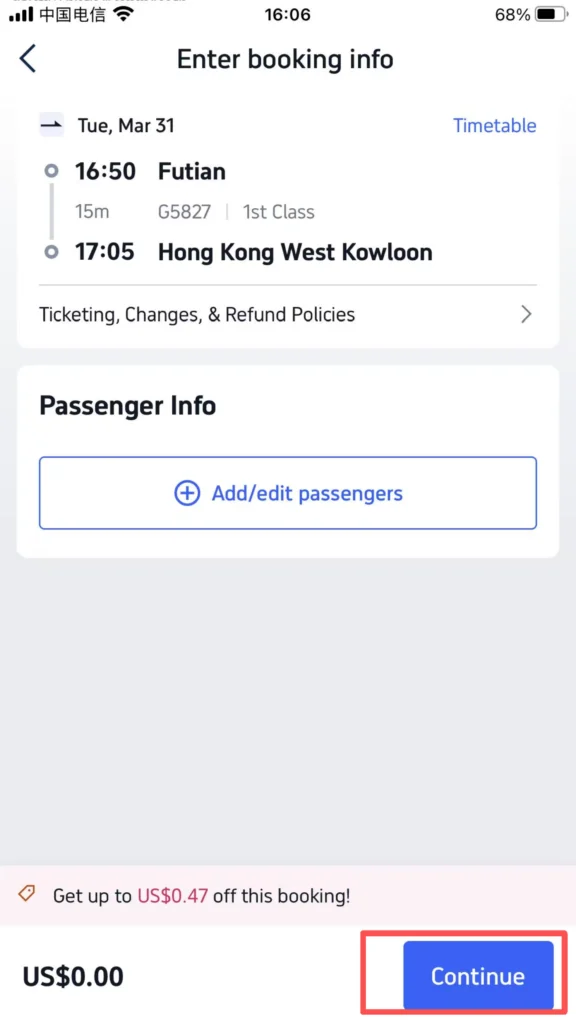
Step 3: Click “Select”, fill in the passenger information (name, passport number), and click “Continue” after confirming it is correct.
1/2
2/2
Step 4: Complete the payment. After the payment is successful, use your passport to print a paper ticket at the train station ticket window or self-service ticket machine, or enter the station directly by swiping your passport (some stations support electronic tickets).
Book Attraction Tickets
Enter the park with a QR code, no paper tickets needed
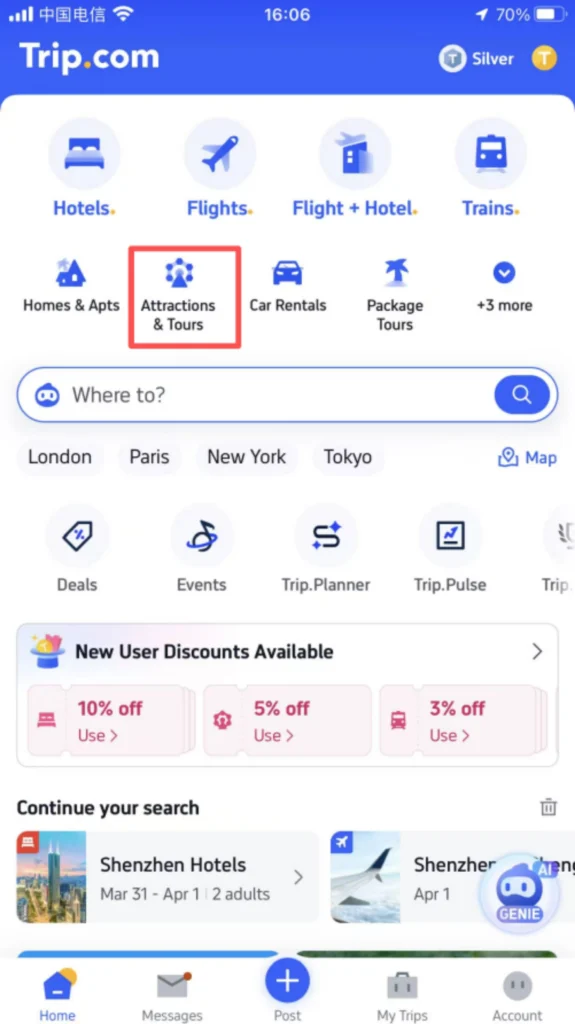
On the homepage, click “Attractions”, enter the name of the attraction (in English/Chinese, such as “The Great Wall” or “West Lake”), and click “Search”.
1/2
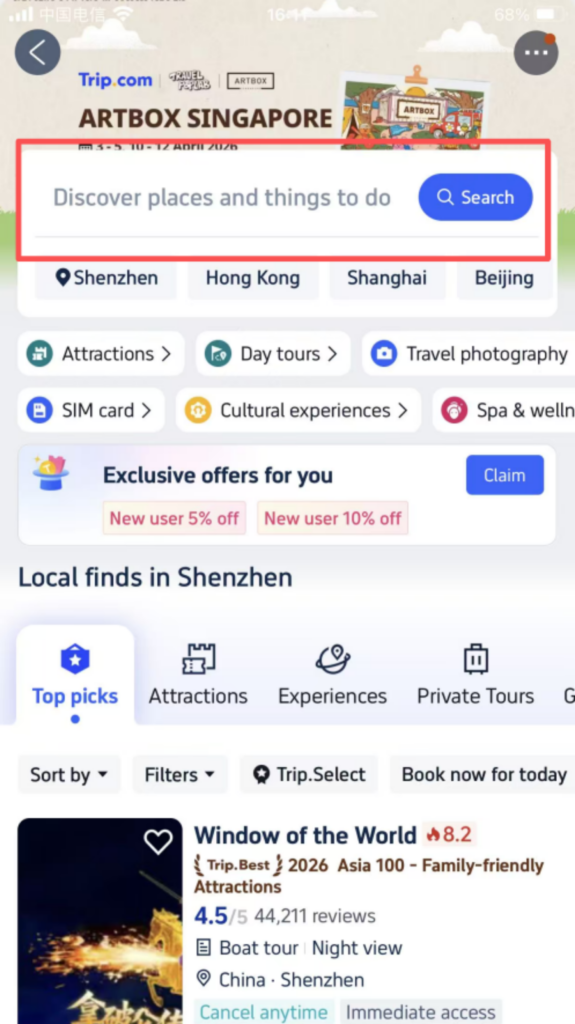
2/2
Step 1: Enter the attraction details page to check the ticket types (adult ticket, child ticket, student ticket), prices, and usage rules (entry time, validity period, whether reservation is required).
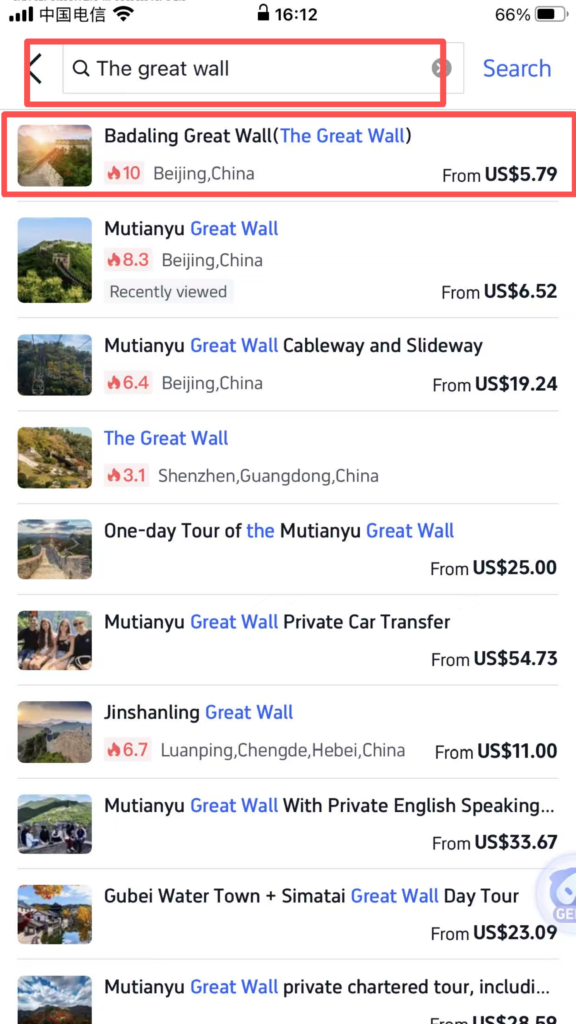
Step 2: Select the type of ticket and the quantity to purchase, click “Book Now”, fill in the visitor information (name, passport number), and click “Continue”.
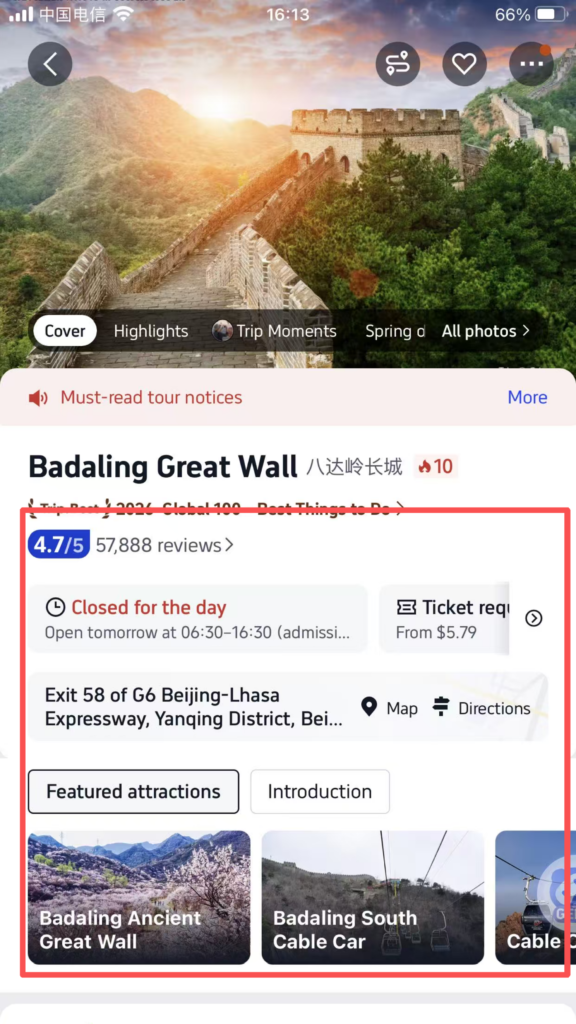
1/2
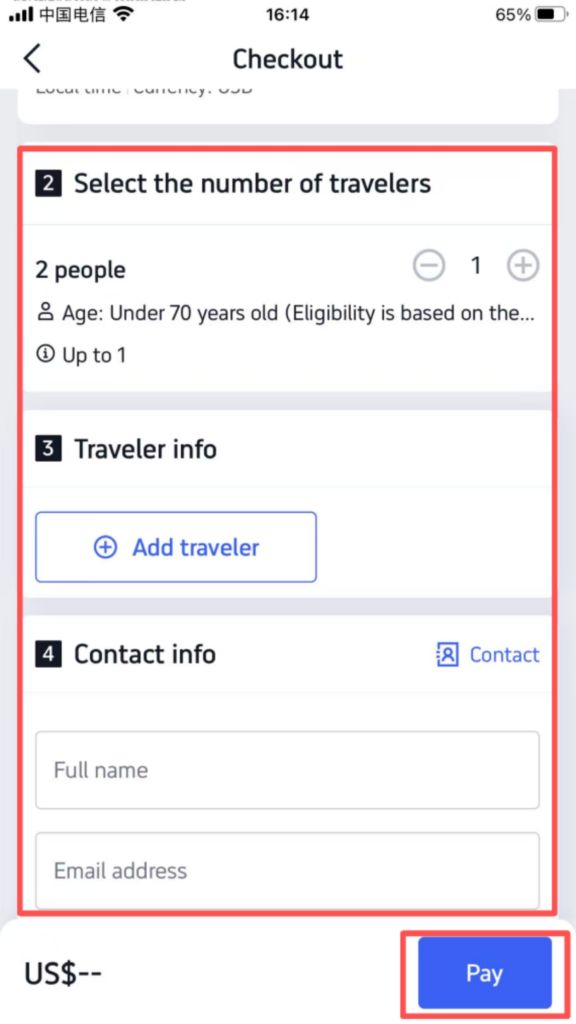
2/2
Step 3: After completing the payment, once the payment is successful, the app will generate a QR code ticket. You can view it in “My Trip”. Show the QR code at the entrance, scan it to enter the park, and there is no need to exchange it for a paper ticket.
🔧 (4) Common Troubleshooting
💳 Payment Failure
Check if your international credit card is enabled for overseas payments and if there is sufficient balance on the card; if using PayPal, check whether the bank card linked to your account is valid.
📋 Order Not Found
After logging in, click “My Trip” and check in “Upcoming Trips”; if you still cannot find it, contact customer service (English support is available in the app).
🔄 Ticket Refund/Change
Go to “My Trip”, find the corresponding order, click “Cancel” or “Modify”, and follow the prompts. Some orders may incur a fee, according to the cancellation policy.
📥 Download Complete PDF Manual
Multi-Language • Offline Printable • All Screenshots Included
(function() { 'use strict'; function initLightbox() { var lightbox = document.getElementById('ichingoLightbox'); var lightboxImg = document.getElementById('lightboxImg'); var lightboxCaption = document.getElementById('lightboxCaption'); var closeBtn = document.getElementById('lightboxClose'); var zoomableItems = document.querySelectorAll('.ichingo-zoomable'); console.log('✅ Lightbox initialized. Found', zoomableItems.length, 'zoomable items'); function openLightbox(src, caption) { if (!src) { console.error('❌ No image source provided'); return; } console.log('🔍 Opening lightbox with:', src); lightboxImg.src = src; lightboxImg.alt = caption || 'Zoomed image'; if (caption) { lightboxCaption.textContent = caption; lightboxCaption.classList.add('visible'); } else { lightboxCaption.classList.remove('visible'); } lightbox.classList.add('active'); document.body.style.overflow = 'hidden'; document.body.style.position = 'fixed'; document.body.style.width = '100%'; } function closeLightbox() { lightbox.classList.remove('active'); document.body.style.overflow = ''; document.body.style.position = ''; document.body.style.width = ''; setTimeout(function() { if (!lightbox.classList.contains('active')) { lightboxImg.src = ''; } }, 300); } zoomableItems.forEach(function(item, index) { var newItem = item.cloneNode(true); item.parentNode.replaceChild(newItem, item); newItem.addEventListener('click', function(e) { e.preventDefault(); e.stopPropagation(); console.log('🖱️ Clicked zoomable item #' + (index + 1)); var src = null; var caption = null; if (this.tagName === 'IMG') { src = this.src; caption = this.getAttribute('data-caption') || this.alt || ''; } else { var img = this.querySelector('img'); if (img) { src = img.src; caption = this.getAttribute('data-caption') || img.alt || ''; } } if (src && src.length > 0) { openLightbox(src, caption); } else { console.warn('⚠️ No valid image found in this element'); } }); newItem.style.cursor = 'pointer'; }); if (closeBtn) { closeBtn.addEventListener('click', function(e) { e.preventDefault(); e.stopPropagation(); closeLightbox(); }); } lightbox.addEventListener('click', function(e) { if (e.target === lightbox) { closeLightbox(); } }); document.addEventListener('keydown', function(e) { if (e.key === 'Escape' && lightbox.classList.contains('active')) { closeLightbox(); } }); } if (document.readyState === 'loading') { document.addEventListener('DOMContentLoaded', initLightbox); } else { initLightbox(); } })();